top of page
DANIEL BELLIDO


STAGE VK - First Graphics Pipeline
After finishing the buffer and upload infrastructure, the next step was finally connecting that work to the graphics pipeline. Until now, STAGE VK could create a Vulkan device, manage the swapchain, record command buffers, render Dear ImGui and upload data to GPU buffers, but it still had no rendering path of its own. This implementation changes that. The goal was simple: render the first triangle using a vertex buffer, custom shaders and a Vulkan graphics pipeline, while int

Daniel Bellido Chueco
Sep 216 min read


Uploading Data to the GPU
Until now, most of the work on STAGE VK had been focused on getting Vulkan itself running correctly. The engine could create an instance, select a GPU, create the logical device and queues, manage a swapchain, record command buffers, synchronize frames and finally present an image to the screen. After that, I separated the rendering architecture into VulkanModule, RenderModule and EditorModule, and added the first editor tools on top of Dear ImGui. All of that gave me a worki
Daniel Bellido Chueco
Sep 2011 min read


Editor Tools II: Profiling CPU and GPU Performance
Performance profiling became the next major editor tool implemented in STAGE VK. The engine already exposed basic frame information such as FPS and delta time, but this was only enough to know whether the application was running at an acceptable rate. It did not explain where CPU time was being spent, how long the GPU required to execute a frame, or what Vulkan work was being submitted. The original performance panel was therefore replaced by a dedicated profiling architectur
Daniel Bellido Chueco
Sep 188 min read


Editor Tools: Introducing the Debug Console
The editor console was implemented as the first dedicated debugging tool for STAGE VK. Until this point, engine messages were mainly exposed through the native application console. While this was sufficient during the first stages of development, it was not a practical solution for an editor-oriented workflow. Vulkan validation messages, engine diagnostics and general runtime information needed to be accessible directly from the editor and presented in a way that could be fil
Daniel Bellido Chueco
Sep 173 min read


Designing the Rendering Architecture
RenderModule, Dear ImGui and the First Editor Layer In the previous STAGE VK development update, the Vulkan backend reached the point where it could acquire a swapchain image, record GPU commands, submit them to the graphics queue and present the result to the window. The rendered result was still intentionally simple: a solid colour. However, reaching that point exposed the next architectural problem. VulkanModule was responsible for both managing the Vulkan frame lifecycle
Daniel Bellido Chueco
Sep 157 min read


Building the First Vulkan Frame
Swapchain, Command Buffers, Synchronization and Presentation Welcome to the third STAGE VK development update. In the previous post, I completed the first stage of the Vulkan backend: creating the Vulkan instance, enabling validation, creating the window surface, selecting a physical device, discovering the required queue families and finally creating the logical device and its queues. At that point, STAGE VK was connected to the GPU, but it still could not actually produce a
Daniel Bellido Chueco
Sep 137 min read


Setting Up the Vulkan Backend
Validation Layers, GPU selection, Queue Families and Logical Device creation Welcome to the second STAGE VK development post. It has been a while since I started this project, and for academic, professional, and personal reasons I did not have the chance to share any updates. However, the idea of continuing to build my own game engine with Vulkan has always stayed in the back of my mind. When I started STAGE VK, I thought I would probably have a triangle on screen by this poi
Daniel Bellido Chueco
Sep 116 min read
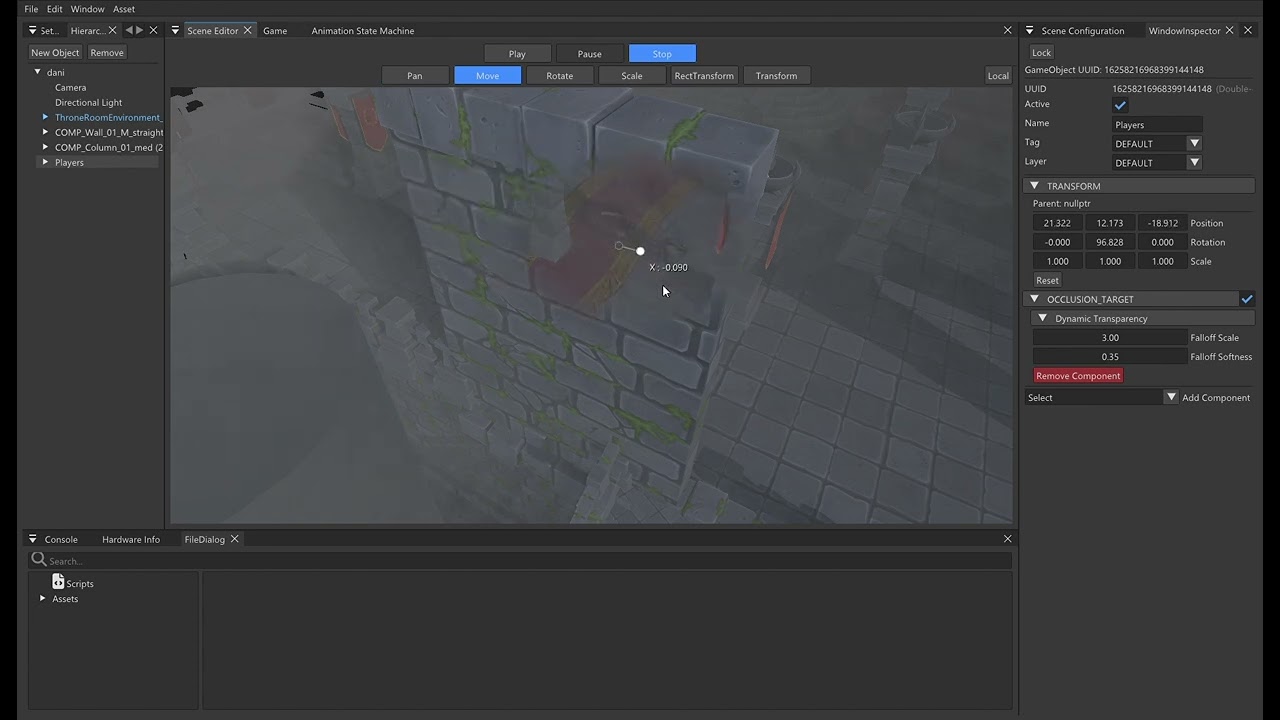
Dynamic Transparency: Target-Driven Occluder Transparency
The Dynamic Transparency system was implemented to improve player visibility when a shared camera becomes blocked by walls or other large environment objects. The implementation is inspired by the Dynamic Transparency technique described by Elmqvist, Assarsson and Tsigas, where occluding geometry is selectively made transparent around important targets instead of fading the entire object. The main goal is simple: If a player is hidden behind an eligible occluder, only the reg
Daniel Bellido Chueco
Aug 283 min read


Volumetric Fog: Frustum-Aligned Compute-Based Atmospheric Scattering
The Volumetric Fog system was implemented following the main architecture presented by Bart Wronski in “Volumetric Fog: Unified Compute Shader Based Solution to Atmospheric Scattering” at SIGGRAPH 2014. The core idea is to represent the participating medium inside a camera-aligned 3D volume, evaluate density and lighting per volumetric cell, integrate scattering along the view direction, and finally composite the accumulated result with the rendered scene. Wronski describes t
Daniel Bellido Chueco
Aug 236 min read


Cascaded Shadow Maps for Directional Shadow Mapping
After implementing Depth Buffer Fitting, the directional shadow system was able to concentrate the shadow map around the geometry actually visible by the camera. However, perspective aliasing was still noticeable because a single shadow map distributed the same amount of resolution across the entire visible depth range. Objects close to the camera therefore received the same shadow-map density as distant geometry, even though near shadows require significantly more detail. Ca
Daniel Bellido Chueco
Aug 163 min read


Depth Buffer Fitting for Directional Shadow Mapping
The Shadow Mapping system previously used the bounding boxes of visible meshes to calculate the light’s orthographic frustum. Although this approach worked, it could produce an unnecessarily large approximation, especially when dealing with large geometry such as terrain or open environments. As a result, a significant portion of the shadow map was wasted on empty areas, reducing the effective resolution of the visible shadows. 1. Depth reduction resources. New GPU textures w
Daniel Bellido Chueco
Aug 72 min read


Screen Space Ambient Occlusion
After implementing directional shadow mapping and improving shadow controls in the editor, the nextstep was to add another important lighting feature to the engine: Screen Space Ambient Occlusion. The goal of this update was to improve contact shadows and depth perception in the scene by darkening small creases, intersections and areas where geometry is close together. Unlike shadow mapping, SSAO is not generated from a light source. Instead, it works in screen spaceusing the
Daniel Bellido Chueco
Jun 223 min read


Shadow Mapping II: PCF and Per-Light ShadowSettings
After implementing the first version of directional shadow mapping in our custom DX12 engine, the next step was to improve how shadows are controlled and filtered. The first implementation gave us working hard shadows for directional lights, including support forstatic and skinned mesh shadow casters. However, the system was still very rigid: shadow settings werehardcoded in the renderer, and every directional light was treated in the same way. For this second iteration, I fo
Daniel Bellido Chueco
Jun 223 min read


Shadow Mapping I
One of the rendering milestones we tackled in the engine was implementing the first version of real-time shadows using shadow mapping. At this stage, the goal was not to build an advanced shadow system with cascades, soft shadows, or complex filtering. The objective was much more focused: get the engine to render a shadow map from a directional light, use it during the lighting pass, and produce hard shadows in the scene. In other words: build the foundation first. What we wa
Daniel Bellido Chueco
Jun 126 min read

Enemy Behaviour with StateMachineScript
After implementing the animation state machine and per-state behaviour scripts, the next step is defining a clear workflow for building enemies on top of this system. This post explains the intended pattern for implementing enemy behaviour so that all gameplay code follows the same structure. Overview Enemy behaviour is built using three main pieces: StateMachineScript (per state) EnemyController (shared logic) Animation State Machine (transitions & flow) Each one has a clear
Daniel Bellido Chueco
Apr 253 min read


Scripting: StateMachineScript
After exposing the animation system to gameplay through AnimationAPI, the next step in my engine was introducing a way to attach behaviour directly to animation states. At that point, gameplay scripts could already trigger transitions, query the active state and control playback. However, all behaviour still had to be written in external scripts, usually centralized in a single controller. That quickly became hard to scale, especially when dealing with multiple states and tra
Daniel Bellido Chueco
Apr 243 min read


Scripting: AnimationAPI
After building the visual state machine editor, the next step in my engine was exposing that runtime animation system to gameplay scripts. At that point, the engine could already load animation state machines, evaluate transitions, react to triggers, and blend correctly at runtime. That made the system usable from the animation side, but gameplay code still had no clean way to interact with it. Scripts needed a proper runtime API layer so they could trigger transitions, query
Daniel Bellido Chueco
Apr 244 min read


State Machine Node Graph Editor
After getting the animation state machine working at runtime, the next step in my engine was improving the editor workflow around it. At that point, the engine could already load an animation state machine resource, start from a default state, react to triggers, and blend transitions at runtime. That was enough to validate the system technically, but editing the resource through inspector fields alone was still too limited and not very comfortable once the number of states an
Daniel Bellido Chueco
Apr 244 min read

Animation State Machine
After building animation playback and skinning, the next step in my engine was moving from “playing a single clip” to actually controlling animation flow through a state machine. In the previous stages, the engine could already import animation clips from glTF, reproduce them at runtime, and deform the character correctly through skinning. That was enough for isolated playback, but not for real gameplay logic. Characters do not just play one animation forever: they need to sw
Daniel Bellido Chueco
Apr 244 min read


Animation II - Skinning
After completing basic runtime playback for glTF animations, the next milestone in my engine was skinning. In the previous phase, I could already import animation clips, play them back at runtime, and apply them correctly to the node hierarchy. The skeleton moved as expected, but the mesh itself still stayed frozen in its bind pose. This task was about solving that missing step: deforming the mesh according to the animated skeleton. What I wanted to achieve The goal was to ma
Daniel Bellido Chueco
Apr 243 min read
bottom of page